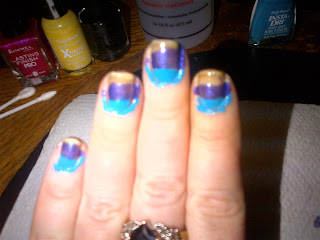
So first step, I added a base coat, then, now I didnt, but I would strongly recommend adding tape around your nails. Same as you do when water marbling, to save you from a messy clean-up. Next take your first color and make a horizontal line on each nail. the first one will be starting from the cuticle. They dont need to be too thin but keep in mind you will be adding more lines, depending on how many colors you want, so they will all have to fit. WIll look like this.
Before I say anything else, dont mind my nails. I just had a black and orange on and my nails are stained. But you can see why I always have nail plish on. I cant ever get them clean. Even with all my cleaning tools and kits. I even bought a buffing and polishing tools but didnt do much. They do look a lot worse her from my previous mani though. Just saying...
 |
| So you can see why I suggested using tape. Makes a mess:) if you make thinner lines, you can add more colors. |
Now the last step is up to you. My plan had been to talk a brush and paint on black lines, to kind of give it a leopard print, but I decided to just use my black crackle and it was the same effect, more or less. I think so anyhow:)
 |
| Not yet cleaned |
 |
| The following were a quick clean I did, I Hadn't done the cuticles yet |
 now I know all manis should finish with a top coat but I kind of regret adding one. I really love the MAtte look and I find that my crackle has a matte look to it. Once I added the top coat, it was way more shiny looking. This and all the next pics have the top coat
And Voila! You should try this. I am glad I did. LEt me know if you do and let me see your versions:)


No comments:
Post a Comment